This project was made 2 months ago. But I'm only posting about it now because I'm too busy being a new mom. ( ◞・౪・)
Being a makeup junkie and a DIY enthusiast made me want to create my own customized makeup palette. I've always been wanting to do this for so long. And now finally here it is! I'll show you my first attempt on creating this DIY makeup palette. This is an inexpensive alternative for the infamous, Z Palette. Why spend $20 on a Z palette when you can be creative and make your own for only $5! Plus, it's more fun customizing your own palette. Just like what I did. (´ ◕◞౪◟-)-☆
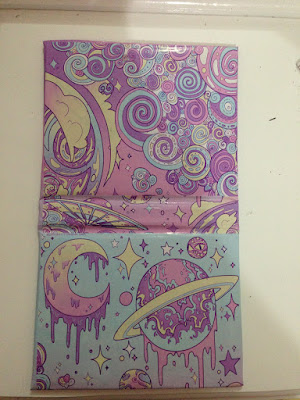
I'll share some snaps and thoughts on how I did mine. It wasn't originally in my plan to do a tutorial for this. This is just like a trial and error, and an experiment to me. I'm still discovering ways on improving them. So I kinda missed taking pictures on some part of the procedure. But I'm planning to do a better palette with a very detailed tutorial soon! But for now, please bear with my not so detailed tutorial. So without further ado, I now present you my first attempt on DIY CUTE GALAXY MAKEUP PALETTE!
TADAAAAAAAAH~ o(≧∇≦o)
Watch this DIY Galaxy Makeup Palette live on my youtube channel!
I had so much fun doing this palette. It's just so pretty and I managed to make it neat. I've always dreamed of a pastel galaxy makeup palette. So I'd like to credit the artists of the prints on this palette. The awesome cover print was made by: GhostlyStatic. I so love ghostlystatic's gallery! And the cute girl inner print was made by: ShiroiRoom. Unfortunately, I can't find the site of the artist so I'm just linking where I got the print. ( ≧Д≦)
Honestly, I just randomly search cute graphics on Pinterest and print them out. I was a bit skeptic on doing so but this is just a experiment and I have no intention on selling them or what. I really do hope they won't mind if I used them for this project. ฅ(๑’Δ’๑)
So now let's move on to how I made them.
Step 1: This palette is made out of an old hardbound mini notebook of mine. I've seen some tutorials using DVD covers and watercolor palette. Honestly, I think they kinda look tacky. I wanted mine to be neat as possible and I want it to look "professionaly done" lol. So I thought a hardbound notebook would be cool to use for that. Well unfortunately, I don't have an image of the notebook that I used. But it's pretty close to this one:
Step 2: I arrange the placement of the eyeshadows. My eyeshadows are from the NYX Smokey Collection Palette. They used to be my favorite. I love the products on this palette but I haven't used them in a while because I'm always in a rush and the packaging is so bulky. It's not an ideal on the go palette for me. So I decided to depot them and make a compact and sleek home for them.
This is the original palette from NYX:
I also made a separate palette for the blush here it is:
It looks cute but it's quite a failure to me. Okay so going back to my tutorial...
Step 3: I made an outline of the arrangement of the eyeshadows.
Step 4: I cut the outline. This is to hold and keep the eyeshadows inside the palette.
Step 5: I printed out this cute art on a sticker paper.
Step 6: I cut an extra cardboard to elevate the eyeshadows and cover them with the printed sticker.
Step 7: Cover everything with the sticker paper.
Step 8: I used mighty bond on attaching the eyeshadows on the palette.
Suggestion: You can also put a mirror inside it. I wanted to put a mirror on it but I don't have a mirror that fits for this palette. So yea, i'll do that on my next project perhaps.
And here's the final result:
It's so cute!! I'm so happy with the outcome. (ノ≧∀≦)ノ It's quick and easy! I'll definitely make more and do a better version. Maybe I can add a magnetic snap so the palette would be more secured. Oh! and a mirror too. And this time, I'll definitely do my own artwork for the print. But for now, I'd like to credit the artists of the prints that I used for this experiment. Hehe~ So yeah I hope you guys like it. Stay tune for my next DIY makeup palette.


